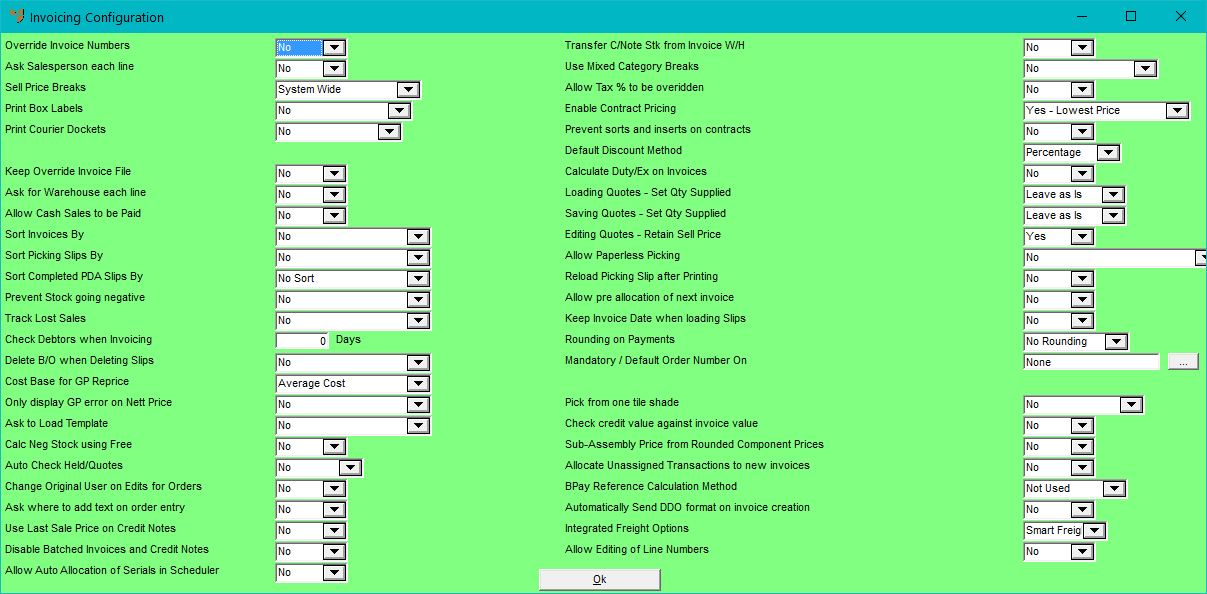
You use the Invoicing Configuration screen to select your default options for invoices and picking slips.
Refer to "Selecting a Company to Edit"
Micronet displays the Invoicing Configuration screen.
|
|
Field |
Value |
|---|---|---|
|
|
Override Invoice Numbers |
Select whether to use the built-in invoice numbering system in Micronet. Options are:
|
|
|
Ask Salesperson each line |
Salespeople can be assigned to either the invoice header or the invoice line(s). Select Yes if you want Micronet to ask for the salesperson for each and every sales line entered, or No if you don't. |
|
|
Sell Price Breaks |
Micronet supports quantity breaks during the invoicing process, where the larger the quantity ordered by the customer the better the selling price selected by Micronet. Pricing normally reduces from Price 8 (highest price) to price 1 (lowest price). If selling prices are going to be used, then the price breaks can be applied to individual items, entire product categories or for the entire system (system wide). The options are:
See also the Sell Price Names field on the Inventory Configuration screen – see "Edit - Program - Inventory". |
|
|
Print Box Labels |
Select whether you want Micronet to print box labels when invoices or picking slips are created. Select No if you don't want to be prompted for labels at invoice/picking slip creation. If you do want box labels printed when invoices or picking slips are created, select one of the following options:
During invoicing/slip creation Micronet prompts you for the number of labels you want to print. If you select Yes then you need to set Micronet for the way in which you want your labels to print. |
|
|

|
Technical Tip You design the label layout using the Report Generator – see "Reports - Report Generator". |
|
|
Print Courier Dockets |
Select whether you want Micronet to print courier dockets when invoices or picking slips are created. Select No if you don't want to be prompted for courier dockets at invoice/picking slip creation. If you do want courier dockets printed when invoices or picking slips are created, select one of the following options:
|
|
|
|
Technical Tip You create courier dockets using the Report Generator – see "Reports - Report Generator". |
|
Keep Override Invoice File |
Select Yes if you want Micronet to store an audit of each time prices and/or discounts are altered by your users during the order/invoicing process. The output audit report can be customised using the Report Generator. |
|
|
Ask for Warehouse each line |
During order entry/invoicing, you can lock a user to selling items from one location only or enable them to draw items from several locations. Select Yes if you want to enable users to select a different warehouse for each invoice line, or select No if they can only select one warehouse per invoice. |
|
|
Allow Cash Sales to be Paid |
Select Yes if you want Micronet to allow cash sales during sales order processing, for both cash and normal account customers. Select No if your company does not allow cash sales, in which case a debtor must be entered against every sales order. If you select Yes, the cash collected is posted to your Bank Deposit report. |
|
|

|
Reference Your selection in the Allow Cash Sales to be Paid field updates the same field on the Cash Sale Payment Configuration screen – see "Edit - Program - Cash Sales Payment Config". |
|
Sort Invoices By |
Select the default order in which invoice lines are sorted when invoices are printed. Options are:
|
|
|
Sort Picking Slips By |
Select the default order in which picking slip lines are sorted when they are printed or downloaded to PDAs. Options are:
|
|
|
Sort Completed PDA Slips By |
Select the default order in which the lines on completed paperless slips are sorted when they are printed. Options are:
If this option is set to Ask At Runtime and the slip is sorted, the resulting invoice print out sequence is independent of the option selected here since it depends on the option selected in the previous setup question. |
|
|
|
Technical Tip Micronet allows you to set default sort orders for invoices, picking slips and paperless slips for specific customers, which override the entries made on this screen. For more information on customer sort orders, see "File - Debtor - Formats". |
|
Prevent Stock going negative |
Select whether you want warnings displayed to users when they process an order which will result in negative stock on hand of an item. The options are:
For information about free stock and how it is calculated, see "Editing the Free Stock Calculation Method". |
|
|
Track Lost Sales |
Select whether you want Micronet to store information relating to lost sales opportunities when users enter a quantity ordered which is greater than the combined quantity of items shipped and/or backordered. The options are:
|
|
|
Check Debtors when Invoicing |
Micronet automatically checks your customer's credit limit and account status (whether they are on hold) to determine if a sales order should be accepted. Enter a value in this field if you also want Micronet to check individual customer invoices on file to see if they have been outstanding for more than a certain number of days from the date of invoice. For example, if you entered 45 in this field, Micronet would check for any customer invoices on file that were older than 45 days, regardless of whether the customer was on hold or not, or whether any credit limit remained available. |
|
|
Delete B/O when Deleting Slips |
Select Yes if you want Micronet to delete any related backorders when the matching picking slip is deleted, or No if you don't. |
|
|
Cost Base for GP Reprice |
When repricing an invoice, you can enter an overriding GP% that you want to have applied to the selling prices based on the Average Cost, Last Cost or Buy Prices 1-8. Select the selling price you want to use when repricing invoices. |
|
|
Only Display GP Error on Nett Price |
2.8 Feature Select Yes if you only want Micronet to warn users when the net price on an item does not meet the Minimum GP percentage set in the Product Category master file (see "File - Product Category - Category"). Select No if you want the warning displayed based on the gross price. |
|
|
Ask to Load Template |
This field applies to order templates used in Invoice Creation. If you select Yes, when a user accepts the Invoice Header screen for the first time, they will be asked whether they want to load an order template. For more information about order templates, see "Order Templates" in the Advanced Distribution Training Manual. Select No if you are not using order templates. |
|
|
Calc Neg Stock using Free |
Refer to the Prevent Stock going negative field above. Select Yes if you want Micronet to deduct stock on hold and on backorder from the stock on hand to see if this order line forces the free stock to go negative. If your company is configured for supply chain, you should set this field to No. |
|
|
Auto Check Held/Quotes |
Select whether you want Micronet to check whether held invoices, quotes or both exist for a customer when starting a new invoice for that customer. If they do, Micronet will give the user the option to load the quote or held invoice details. If you don’t want Micronet to check for held invoices or quotes, select No. |
|
|
|
Change Original User on Edits for Orders |
This setting lets you select whether you want to retain the user ID of the original user who created a sales order, or whether you want the user ID updated with the last person who amended an order. It relates to the DIH_USERID field which is used on invoice formats and other sales reports. If set to No, Micronet will retain the user who originally created the sales order in the DIH_USERID field; it will never update that field. If set to Yes, Micronet will store the user who last modified a sales order in the DIH_USERID field. |
|
|
Ask where to add text on order entry |
|
|
|
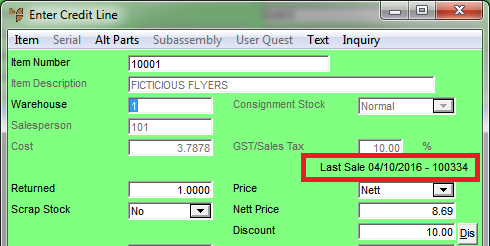
Use Last Sale Price on Credit Notes |
Select how you want Micronet to set prices on credit note lines. If you set this field to Yes and:
For the first two points above, the price will include any discounts that applied on the invoice. The invoice number and date that the price was retrieved from will also be displayed above the Price field on the Enter Credit Line screen, as shown:
If you set this field to No and:
|
|
|
Disable Batched Invoices and Credit Notes |
Select whether you want users to have the ability to post invoices and credit notes to a batch for later batch printing. If you set this field to Yes, the FILE | BATCH PRINT menu option is removed from the Invoice Creation and Credit Note Creation programs. For more information, see "Invoice Creation - File - Batch Print" and "Credit Creation - File - Batch Print". |
|
|
Allow Auto Allocation of Serials in Scheduler |
Select Yes if you want to allow serial numbers to be automatically allocated to picking slips in the Warehouse Scheduler – see "Edit Schedule - Special - Re-Allocate Serials (v2.8)". Select No if serial numbers should be allocated manually. |
|
|
|
Technical Tip Note that if the Pick from one tile shade field (below) is set to On Order Scheduling, you don't need to set the Allow Auto Allocation of Serials in Scheduler field to Yes. That setting will continue to work correctly. |
|
Transfer C/Note Stk from Invoice W/H |
This field applies to processing credit notes. Select Yes if you want to allow users to credit stock back to a different warehouse to the one from which it was invoiced. Select No if stock can only be credited back to its original invoice warehouse. |
|||||||||||||||||||||||||||||||||||||
|
Use Mixed Category Breaks |
Where category price breaks are being used (see the Sell Price Breaks field above), mixed category breaks can be applied where a number of similar items are to be involved in the quantity break calculation. An example is where Category 10 = PENS and the category sales breaks are set as:
If mixed category breaks are set for Category 10 and the sales quantity consists of 10 Green Pens, 10 Red Pens, 50 Blue Pens and 40 Black Pens then, when the invoice is totalled, Micronet adds the mixed quantity of PENS together for a total quantity of 110 pens and then selects Price 6 or $1.30 per pen. You set Micronet to use mixed category breaks in the Product Category master file – see "File - Product Category - Markups". |
|||||||||||||||||||||||||||||||||||||
|
Allow Tax % to be overridden |
Select Yes if you want users to be able to change your default sales tax percentages at order processing time, or No if you don't. |
|||||||||||||||||||||||||||||||||||||
|
Enable Contract Pricing |
Select whether you are using debtor contracts for invoice pricing as setup in the Debtors Contract Pricing master file – see "File - Debtors Contract Pricing". The options are:
|
|||||||||||||||||||||||||||||||||||||
|
|
Prevent sorts and inserts on contracts |
2.8 Feature Setting this field to Yes prevents users from sorting the items on a debtor contract. If this field is set to Yes and a user selects any of the SORT menu options on the Debtors Contract File Update screen, Micronet will display an error message that it is unable to sort debtor contracts based on the company security settings – see "Sort - Item / Status / Category". |
||||||||||||||||||||||||||||||||||||
|
|
Default Discount Method |
Select the default discount method that Micronet should use when setting customer discount matrices. Percentage is the default. |
||||||||||||||||||||||||||||||||||||
|
|
Calculate Duty/Ex on Invoices |
This field only applies to distributors and retailers in the Liquor Industry. Select Yes if you want Micronet to calculated duty and excise on invoices, or No if you don't. |
||||||||||||||||||||||||||||||||||||
|
|
Loading Quotes - Set Qty Delivered |
Select how you want Micronet to set the quantity Supplied on the Invoice Creation screen when users recall a quote. The options are:
|
||||||||||||||||||||||||||||||||||||
|
|
Loading Quotes - Set Qty Supplied |
2.8 Feature The Loading Quotes - Set Qty Delivered field has been renamed in Micronet 2.8. |
||||||||||||||||||||||||||||||||||||
|
|
Saving Quotes - Set Qty Delivered |
Select how you want Micronet to set the quantity Supplied when users first save a quote on the Invoice Creation screen. The options are:
|
||||||||||||||||||||||||||||||||||||
|
|
Saving Quotes - Set Qty Supplied |
2.8 Feature
The Saving Quotes - Set Qty Delivered field has been renamed in Micronet 2.8. |
||||||||||||||||||||||||||||||||||||
|
|
Editing Quotes - Retain Sell Price |
Select Yes if you don’t want the sell price to change when a quote is loaded and the quantity of an item is modified. Select No if you do want the sell price to change. |
||||||||||||||||||||||||||||||||||||
|
Allow Paperless Picking |
This option only applies if your company has the optional Micronet Mobile Applications module. You use this option to select the server you want Micronet to interface with for paperless picking - that is, sales orders that are generated on Sales Force PDAs or via an Internet ordering system and downloaded from Micronet directly to PDAs for picking and despatch. The options are:
If you select a server type, Micronet performs the following checks when loading paperless picking slips:
|
|||||||||||||||||||||||||||||||||||||
|
|
Reload Picking Slip after Printing |
Select Yes if you want picking slips redisplayed after printing, or No if you don’t. |
||||||||||||||||||||||||||||||||||||
|
|
Allow pre allocation of next invoice |
Select Yes if you want users to be able to reserve invoice numbers when entering new sales orders, or No if you don't. |
||||||||||||||||||||||||||||||||||||
|
|
Keep Invoice Date when loading Slips |
Select Yes if you want Micronet to retain the original slip creation date as the invoice date when a slip is recalled and converted to a customer invoice, or No if you don't. |
||||||||||||||||||||||||||||||||||||
|
|
Rounding on Payments |
Select whether you want Micronet to apply rounding on payments to the nearest 5 cents or 10 cents. Otherwise, select No Rounding. |
||||||||||||||||||||||||||||||||||||
|
|
Collect Picking Slip Date |
Options are:
|
||||||||||||||||||||||||||||||||||||
|
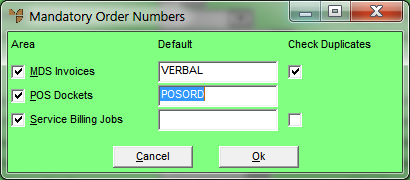
Mandatory / Default Order Number On |
If you want Micronet to check that an order number has been entered on invoices, POS dockets and/or MJC service jobs, choose the browse button (…) and check the appropriate boxes on the Mandatory Order Numbers screen. If you want a default order number entered on all invoices, dockets and/or jobs, enter the default number in the Default field.
If you also want Micronet to check for duplicate order numbers on MDS invoices and/or MJC service jobs, check the appropriate Check Duplicates boxes. Select Ok to redisplay the Invoicing Configuration screen. If you don’t want Micronet to check for order numbers on invoices, POS dockets or MJC service jobs (i.e. the Order Number field can be left blank), enter None in this field. |
|
|
|
Technical Tip Even when mandatory order numbers are turned on, Micronet will not enforce an order number for debtors set up as Cash accounts. The only exception to this is for CapLink customers; when mandatory order numbers are turned on, Micronet will enforce an order number. |
|
|
Pick from one tile shade |
2.8 Feature This setting is designed for items such as tiles where it is important that all the items delivered to a customer come from the same serial number / batch. If you want Micronet to automatically allocate entire order quantities from one serial number / batch, select one of the following options:
When either of these options is selected, Micronet will work its way through the serial number / batches in bin priority order until it finds a serial number / batch with enough stock to allocate the entire order quantity. If there are multiple lines for the same item within a single order, or multiple orders for the same item are being scheduled, the largest order quantity for the item will be allocated first. If no serial number / batch has enough stock to allocate the entire order quantity, Micronet displays a warning message that it failed to find a serial batch for the entire order quantity. The user will need to either:
This setting applies to Invoice Creation, Automatic Backorder Allocations, Allocation From Purchasing/Transfers and the Warehouse Scheduler. |
|
|
Check credit value against invoice value |
2.8 Feature Select Yes if you want Micronet to warn users if the value of a credit note is greater than the value of the original invoice, or if the value of a line being credited is greater than the original line value. Otherwise, select No. |
|
|
Sub-Assembly Price from Rounded Component Prices |
|
|
|
Allocate Unassigned Transactions to new invoices |
Micronet can allow the allocation of unassigned credits against a sales desk invoice during invoice creation. If you want Micronet to prompt users to allocate unassigned credits during invoice creation, select Yes. When invoices are created, Micronet will display a list of unassigned transactions and allow the user to select a transaction to allocate against the invoice. Otherwise select No. |
|
|
BPay Reference Calculation Method |
Select whether you want Micronet to automatically generate BPAY reference numbers when invoices are created. The options are:
|
|
|
|
Technical Tip If Micronet is set to generate BPAY reference numbers, you also need to add the BPAY reference field to your invoice format(s) using the Report Generator – see "Edit - Add Field". |
|
|
Automatically Send DDO format on invoice creation |
Select Yes if you want Micronet to send invoices automatically in electronic DDO file format when the invoice is posted (in either MDS or POS). When users print or post an invoice, Micronet opens a new email message in their default email program and attaches the electronic invoice to it. If the invoice format belongs to the DDOINV group, the invoice will be attached in both PDF and DDO formats. The PDF and DDO files are both saved in the directory specified in the DDOPath Registry key or in the [company path]\PDA\DDO directory and then under \company number\debtor number\invoice number. If this option is set to Yes, the same applies to credit notes. If you don't want invoices sent automatically, select No. |
|
|
Integrated Freight Options |
2.8 Feature If you are using an external freight provider, select the provider – either Smart Freight or Sendit. Depending on the option you select here, when users select the FILE | SEND TO SMART FREIGHT option in Invoice Creation, Micronet will send the invoice to either Smart Freight or Sendit to get a consignment note number and the delivery charges for the invoice. For more information, see "Invoice Creation - File - Send to Smart Freight". |
|
|
Allow Editing of Line Numbers |
2.8 Feature This field relates to EDI orders imported to Micronet by Data.Connect. When this field is set to Yes, and users add or edit an item on an invoice, a Line Number field is displayed on the Enter Invoice Line screen. Users can then edit the invoice line number that is set by Data.Connect. |
Micronet redisplays the Change Existing Company screen.
Refer to "Logging in With Updated Configuration (Method 1)" or "Logging In With Updated Configuration (Method 2)".